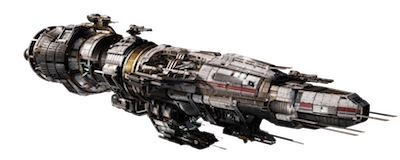
The Destroyer extends the USR Heavy line with a ship bristling with turrets and built around ranged offensive capability. The ship carries large scale turrets capable of a range of 25km with an optimum range of around 15km. Its optimum attack is broadside bombardment from range and it must be stationary to maximize its accuracy. Captains must be aware that at close range, the ship and its turrets cannot react quickly enough to be effective and the ship is best deployed at range for use as fire support.
Summary[ | ]
Boasting massive cannons with a range surpassed only by that of the Watchman, the Destroyer is capable of putting severe firepower downrange before other ships are able to engage it. The Destroyer is also a strong ship in close-quarters combat, although it is not suited for that role. The main armament struggles with hitting light craft due to the shells' slow velocity, but is very potent against mediums and other heavies. Its bomber wing and missiles give it added striking power against larger ships. Capable Destroyer pilots must know how to effectively utilize their Jamming systems to deny valuable intel to his enemy, and properly lead the massive cannons of the Destroyer to accurately and effectively hit and destroy his target.
Loadout[ | ]
Key
Tier 1
Tier 2
Tier 3
LMB
Artillery Cannon
Range:
20.3 km (7250 m/s x 2.8 s)
Optimal Range:
15000 m
Damage:
6 x (100 ppd)
DPS:
400
Cooldown:
1.5 s
Artillery Cannon deals massive damage. Whilst these cannons have a long max range, hitting enemy ships can be difficult unless the distance is closed.
Light Artillery Cannon
Range:
20.3 km (7250 m/s x 2.8 s)
Optimal Range:
15000 m
Damage:
6 x (73 ppd)
DPS:
400
Cooldown:
1.095 s
Light Artillery Cannons have a higher projectile speed on a shorter cooldown. This benefits accuracy and consistent damage at the expense of burst damage.
Heavy Artillery Cannon
Range:
20.3 km (7250 m/s x 2.8 s)
Optimal Range:
15000 m
Damage:
6 x (130 ppd)
DPS:
390
Cooldown:
2 s
The Heavy Artillery Cannons fire high damage projectiles but at a lower rate of fire and projectile speed. Whilst burst damage is increased, leading shots becomes more difficult.
RMB
Explosive Charges
Range:
25 km (6250 m/s x 4 s)
Radius:
600 m
Damage:
5 x (43 ppd)
DPS:
21.5
Cooldown:
10 s
Explosive Charges detonate at the range of your target, dealing AoE damage.
Deflagration Charges
Range:
25 km (6250 m/s x 4 s)
Radius:
500 m
Damage:
10 x (22 ppd)
DPS:
22
Cooldown:
10 s
A series of rapid firing low-yield charges designed to combat manoeuvrable vessels.
Detonation Charge
Range:
25 km (6500 m/s x 4 s)
Radius:
600 m
Damage:
1 x (213 ppd)
DPS:
21.3
Cooldown:
10 s
A charge-to-fire weapon that releases a single charge for greater intial impact.
Destroyer Fighters can be ordered to engage enemy ships. Enemy Fighters, Bombers and then Drones are attacked as a priority before attacking the ship.
Tactics[ | ]
When playing as a Destroyer[ | ]
The Destroyer is one of the best long range damage dealers, be sure to fight in a zone with good line of sight.
Avoid shooting at anything above, below or behind you, the Destroyer's turrets have a limited arc of fire
The cannons aboard the Destroyer have poor muzzle velocity and below average accuracy. Prioritize targeting the slowest/largest enemy ships to ensure hits.
Learn to lead your shots when shooting at fast-moving targets. The Destroyer's long range is hampered by it's poor muzzle velocity (the speed of it's shells)
When playing against a Destroyer[ | ]
The Destroyer can only fire two out of it's six guns when it's target it directly above and below the ship. Stealth ships and fast attack ships should take advantage of this weakness.
The Destroyer is not only a very slow ship, it's turrets are also very slow. Fast attack ships such as the Hunter or the Sentinel can actually outrun the Destroyer's guns. Circle the Destroyer at point blank range to avoid death.
At long range, the Destroyer is the most destructive ship. Be sure to maneuver aggressively and utilize cover to avoid it's shells.
Tips[ | ]
Your broadside is the only place where you can fire your six-gun full salvo. Do not, under any circumstances, engage enemies from below or above - your firing arcs are quite restricted. Always attempt to stay on the same elevation, and keep your guns pointed at the enemy - at the worst case scenario, you'll get 4 of your guns firing forward.
Protect your weak points! You can't fire very well behind you, nor above or below you. Maneuver so that enemies stay out of these vulnerable sectors and stay in your effective arcs.
Explosive charges can be used to depth charge out cloaked enemies.